Chapter 4

Corel® Quattro® Pro 8 Product Commands
P - Q
{Page.Property}
Syntax (Quattro Pro)
{Page.Property}
{Page.Property} is the command equivalent for Format | Sheet. Each command affects the active sheet(s). The next table lists the possible settings for Property. To display a property description with syntax, choose the property in the following list:
|
Property |
Format | Sheet option |
|
Conditional_Color |
Color |
|
Default_Width |
Width |
|
Display |
Display |
|
Name |
Name |
|
Protection |
Protection |
|
Tab_Color |
Color |
|
Zoom_Factor |
Factor |
You can use {Page?} or {Page!} to display the Active Sheet dialog box. {Page?} lets the user manipulate the dialog box, whereas {Page!} relies on the macro to manipulate it.
{Page.Conditional_Color.Option}
|
{Page.Conditional_Color.Option} |
Equivalent to Format | Sheet... |
|
{Page.Conditional_Color “Enable, SmallVal, GreatVal, BelowColor, NormalColor, AboveColor, ERRColor”} |
...| Conditional Color |
|
{Page.Conditional_Color.Above_Normal_Color 0-15} |
...| Conditional Color | Above Normal Color |
|
{Page.Conditional_Color.Below_Normal_Color 0-15} |
...| Conditional Color | Below Normal Color |
|
{Page.Conditional_Color.Enable Yes|No} |
...| Conditional Color | Enable |
|
{Page.Conditional_Color.ERR_Color 0-15} |
...| Conditional Color | ERR Color |
|
{Page.Conditional_Color.Greatest_Normal_Value Value} |
...| Conditional Color | Greatest Normal Value |
|
{Page.Conditional_Color.Normal_Color 0-15} |
...| Conditional Color | Normal Color |
|
{Page.Conditional_Color.Smallest_Normal_Value Value} |
...| Conditional Color | Smallest Normal Value |
{Page.Conditional_Color.Option} is equivalent to thesheet property Conditional Color, which makes cells change text color (based on the value in the cell). Each color specified in these commands is a number from 0 to 15, corresponding to which color of the notebook palette to use (1 through 16).
Example
The following macro makes negative values red, values greater than 10,000 green, ERR cells cyan, and positive values less than 10,000 black (assuming the default notebook palette is used).
{Page.Conditional_Color “Yes,0,10000,4,3,5,7"}
{Page.Default_Width}
Syntax (Quattro Pro)
{Page.Default_Width Width}
{Page.Default_Width} is equivalent to the sheet property Default Width. It sets the default column width of the active sheet. Width is the new column width in twips (a twip is 1/1440th of an inch).
Example
{Page.Default_Width “720"} makes the default column width a half inch (720 twips).
{Page.Display.Option}
|
{Page.Display.Option} |
Equivalent to Format | Sheet... |
|
{Page.Display DisplayZeros?(Yes|No), RowBorders?(Yes|No), ColumnBorders?(Yes|No), HorzGridLines?(Yes|No), VertGridLines?(Yes|No)} |
...| Display |
|
{Page.Display.Borders “RowBorders?(Yes|No), ColumnBorders?(Yes|No)} |
...| Display | Border Options |
|
{Page.Display.Borders.Column_Borders Yes|No} |
...| Display | Border Options | Column Borders |
|
{Page.Display.Borders.Row_Borders Yes|No} |
...| Display | Border Options | Row Borders |
|
{Page.Display.Display_Zeros Yes|No} |
...| Display | Display Zeros |
|
{Page.Display.Grid_Lines “HorizGridLines?(Yes|No), VertGridLines?(Yes|No)”} |
...| Display | Grid Lines |
|
{Page.Display.Grid_Lines.Horizontal Yes|No} |
...| Display | Grid Lines | Horizontal |
|
{Page.Display.Grid_Lines.Vertical Yes|No} |
...| Display | Grid Lines | Vertical |
{Page.Display.Option} is equivalent to the sheet property Display, which sets the display of zeros, borders, and grid lines. The arguments of {Page.Display} (which sets all options of the Display property in one command) use the same syntax as those in the {Page.Display.Option} commands. All {Page.Display} arguments take Yes|No string values.
Example
The following macro displays zero values on the sheet, but hides borders and grid lines.
{Page.Display “Yes,No,No,No,No”}
{Page.Name NewName} is equivalent to the sheet property Name. It sets the name of the active sheet to NewName.
{Page.Protection.Option}
|
{Page.Protection.Option} |
Equivalent to Format | Sheet... |
|
{Page.Protection “CellLocking?(Yes|No), ObjectLocking?(Yes|No)”} |
...| Protection |
|
{Page.Protection.Cells Yes|No} |
...| Protection | Enable Cell Locking |
|
{Page.Protection.Objects Yes|No} |
...| Protection | Enable Object Locking |
{Page.Protection} is equivalent to the sheet property Protection. It enables or disables cell and object protection on the active sheet.
{Page.Tab_Color}
Syntax (Quattro Pro)
{Page.Tab_Color “Red, Green, Blue, UseRGB?”}
{Page.Tab_Color} changes the tab color of the active sheet; Red, Green, and Blue are integers from 0 to 255.
{Page.Zoom_Factor}
Syntax (Quattro Pro)
{Page.Zoom_Factor 10-400}
{Page.Zoom_Factor} is equivalent to the sheet property Zoom Factor (and the View | Zoom command), which sets the zoom factor of the active sheet (from 10% to 400%). This setting is for display only and does not affect printed output.
{PageViewGoto}
Syntax (Quattro Pro)
{PageViewGoto}
Syntax (PerfectScript)
PageViewGoto()
Switches from either the Objects Sheet or the sheet in Draft mode to Page View. Equivalent to View | Page.
{PANELOFF}
{PANELOFF} disables normal display of menus and prompts during macro execution when Corel Quattro Pro’s Macro Suppress-Redraw property is set to None. It can significantly speed up execution for macros that use keystrokes to walk through menus, since it saves Corel Quattro Pro the time normally needed to draw its menus on the screen. Its effect is canceled by Corel Quattro Pro once the macro stops executing, so you need not worry about locking macro users out of the menus. To cancel its effect during macro execution, use {PANELON}.
{PANELOFF} does not disable menus created by {MENUCALL} and {MENUBRANCH} or subroutine calls that use menus or dialog boxes. Use this command with {WINDOWSOFF} to completely disable normal screen updating.
{PANELON}
{PANELON} enables display of menus and prompts that have been disabled with {PANELOFF}. {PANELON} has no effect if used without an accompanying {PANELOFF}. Therefore, it can be used repeatedly with no ill effects.
Use this command with {WINDOWSON} to completely restore normal screen updating.
{Parse.Option}
|
Command |
Description |
|
{Parse.Create} |
Builds the format line |
|
{Parse.EditLine} |
Lets you specify a new format line |
|
{Parse.Go} |
Use after setting up input and output cells and creating a format line |
|
{Parse.Input Block} |
Indicates the cells to parse |
|
{Parse.Output Block} |
Indicates the cells to hold parsed data |
|
{Parse.Reset} |
Clears previous settings |
{Parse.Option} breaks long text strings into data fields according to a format line. This command is the equivalent of choosing Quattro Pro - DOS in Tools < Settings < Macro < Slash Key, then clicking / < Tools < Parse.
Examples
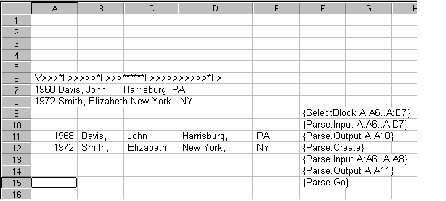
The macro in the next figure selects text cells, builds a format line in the first line of the selected cells, identifies the format line and text as the parse input cells, specifies output cells, and performs the parse. (Each item in the example contains the same number of characters, either spaces or characters.)
To use {Parse.EditLine}, follow the macro with a {CLEAR} macro command, then the string for the new format line, and a {CR} macro, as shown in the following example:
{ParseExpert.Option}
The following commands correspond to the QuickColumns features accessed through Data | Data Tools | QuickColumns.
|
Command |
Equivalent to Tools | Data Tools | QuickColumns... |
|
{ParseExpert.ApplyFormatting 0|1} ParseExpert_ApplyFormatting(Apply?: 0|1) |
...Options | Apply Formatting to spreadsheet. |
|
{ParseExpert.ColumnWidths 0|1} ParseExpert_ColumnWidths(Apply?: 0|1) |
...Options | Set spreadsheet column widths. |
|
{ParseExpert.ConsecutiveAsOne 0|1} ParseExpert_ConsecutiveAsOne(Apply?: 0|1) |
...Options | Treat consecutive delimiters as one when Data Type is set to “Delimited”. |
|
{ParseExpert.DataType Fixed|Delimited} ParseExpert_DataType(Type?: Fixed|Delimited) |
...Options | Data Type. |
|
{ParseExpert.DelimiterType Space|Tab|Comma|CommaQuote|Other} ParseExpert_DelimiterType(Type?: Space|Tab|Comma|CommaQuote|Other) |
...Options | Delimited when Data Type is set to “Delimited” |
|
{ParseExpert.Go} ParseExpert_Go() |
...Parse. |
|
{ParseExpert.IgnoreNonConformingRows 0|1} ParseExpert_IgnoreNonConformingRows(Apply?: 0|1) |
...Options | Ignore nonconforming rows when Data Type is set to “Fixed”. |
|
{ParseExpert.InputBlock InputBlock} ParseExpert_InputBlock(Block?: InputBlock) |
...Source | Block when InputType is set to Block instead of File. |
|
{ParseExpert.InputFile Filename} ParseExpert_InputFile(Filename?: Filename) |
...Filename when InputType is set to File instead of Block. |
|
{ParseExpert.InputType Block|File} ParseExpert_InputType(Type?: Block|File) |
...Source. |
|
{ParseExpert.JoinBrokenLines 0|1} ParseExpert_JoinBrokenLines(Apply?: 0|1) |
...Options | Join broken lines at, when Data Type is set to “Fixed”. |
|
{ParseExpert.LineLength Number} ParseExpert_LineLength(Length?: Number) |
Equivalent to Tools | Data Tools | QuickColumns | Options | Join broken lines at ??? lines, when Data Type is set to “Fixed”. |
|
{ParseExpert.LoadSettings} ParseExpert_LoadSettings() |
...Load Settings. |
|
{ParseExpert.OtherDelimiter DelimiterChar} ParseExpert_OtherDelimiter(OtherDelimiter?: DelimiterChar) |
...Options | Other when Data Type is set to “Delimited”. |
|
{ParseExpert.OutputBlock OutputBlock} ParseExpert_OutputBlock(Block?: OutputBlock) |
...Destination | Block. |
|
{ParseExpert.PageLength Number} ParseExpert_PageLength(Length?: Number) |
...Options | Set page length to ??? lines. |
|
{ParseExpert.PageLengthEnabled 0|1} ParseExpert_PageLengthEnabled(Apply?: 0|1) |
...Options | Set page length to. |
|
{ParseExpert.Restore} ParseExpert_Restore() |
...Restore. |
|
{ParseExpert.SaveSettings} ParseExpert_SaveSettings() |
...Save Settings. |
|
{ParseExpert.SettingsFile Filename} ParseExpert_SettingsFile(Filename?: Filename) |
...Save Settings—the file itself. |
|
{ParseExpert.Skip1stChar 0|1} ParseExpert_Skip1stChar(Apply?: 0|1) |
...Options | Skip 1st Character when Data Type is set to “Fixed”. |
|
{ParseExpert.TextQualifier SingleQuote|DoubleQuote|None} ParseExpert_TextQualifier(Type?: SingleQuote|DoubleQuote|None) |
...Options | Text Qualifier when Data Type is set to “Delimited”. |
|
{ParseExpert.ValueQualifier SingleQuote|DoubleQuote|None} ParseExpert_ValueQualifier(Type?: SingleQuote|DoubleQuote|None) |
...Options | Value Qualifier when Data Type is set to “Delimited”. |
{PasteFormat}
Syntax (Quattro Pro)
{PasteFormat LinkType}
Syntax (PerfectScript)
PasteFormat (LinkType: String)
Parameters
LinkType
Format to paste object as.
{PasteFormat} is equivalent to Edit | Paste Special, which lets you paste data in a specific format (for example, an OLE object) into a notebook. Use LinkType to specify the paste format.
Example
{PasteFormat Bitmap} pastes the data in the Clipboard as a bitmap into the active notebook.
You can use {PasteFormat?} or {PasteFormat!} to display the Paste Special dialog box. {PasteSpecial?} lets the user manipulate the dialog box, whereas {PasteSpecial!} relies on the macro to manipulate it.
{PasteLink}
{PasteLink} is equivalent to using Edit | Paste Special to set up a DDE link to another application.
{PasteSpecial}
Syntax (Quattro Pro)
{PasteSpecial Properties, Formula cells, Label cells, Number cells, Formula values, Transpose, NoBlanks, Cell_Comments}
Syntax (PerfectScript)
PasteSpecial ([Properties: String]; [FormulaCells: String]; [LabelCells: String]; [NumberCells: String]; [FormulaValues: String]; [Transpose: String]; [NoBlanks: String]; [Cell_Comments?: String)
The last argument is new to 8.0 for Cell Comments.
Parameters
Properties
Properties to paste properties from Clipboard; “” otherwise.
Formula Cells
Formula cells to paste from Clipboard, “” otherwise.
Number Cells
Number cells to paste from Clipboard, “” otherwise.
Formula Values
Pastes formula cells as values, “” otherwise.
Transpose
Switches the position of entries (data listed in columns is placed in rows and vice versa), “” otherwise.
NoBlanks
Avoids pasting blank cells from Clipboard; “” otherwise.
Cell_Comments
Pastes cell comments; “” otherwise.
{PasteSpecial} is equivalent to using Edit | Paste Special to paste certains aspects of Corel Quattro Pro data from the Clipboard.
You can use {PasteSpecial?} or {PasteSpecial!} to display the Paste Special dialog box. {PasteSpecial?} lets the user manipulate the dialog box, whereas {PasteSpecial!} relies on the macro to manipulate it.
Example
The following macro pastes properties, formula cells, and numbers from the Clipboard, and skips any blank cells.
{PasteSpecial Properties, Formula Cells,"",Number cells,"","",NoBlanks,""}
{PAUSEMACRO}
{PAUSEMACRO} is used with {DODIALOG} or a command equivalent invoked with ! to pause the macro so that the user can “finish up” whatever dialog box is displaying. Once the user finishes using the dialog box (by choosing OK, or canceling it), macro execution resumes with any macro commands following the {PAUSEMACRO}.
Tip
Use {PAUSEMACRO} only when a dialog box is displaying, Corel Quattro Pro is in FIND mode (using Tools | Data Tools | Notebook Query), or Corel Quattro Pro is in INPUT mode (using {RestrictInput.Option}). Otherwise, the macro pauses indefinitely.
Example
The following macro displays the Edit | Copy Cells dialog box, sets the From edit field to A1, activates the To edit field, and then waits for the user to complete the copy operation. Once the user finishes the dialog box, the macro beeps and moves down a cell.
_copy_a1 {BlockCopy!}
{ALT+F}
A1
{ALT+T}
{PAUSEMACRO}
{BEEP}{DOWN}
{PGDN} and {PGUP}
Syntax (Quattro Pro)
{PGDN <Number>},{PGUP <Number>}
Parameters
Number
Any positive integer or address of a cell containing a positive integer (optional).
{PGDN} and {PGUP} are equivalent to PgDn and PgUp, respectively. Use Number to specify how many times the operation is repeated; for example, {PGUP 7} is equivalent to pressing PgUp seven times.
{PlayPerfectScript}
Syntax (Quattro Pro)
{PlayPerfectScript Filename}
Parameters
Filename
Name of a PerfectScript macro file to run.
{PlayPerfectScript} is the command equivalent for Tools | Macro | Play | PerfectScript.
{POKE}
Syntax (Quattro Pro)
{POKE DDEChannel, Destination, DataToSend}
Syntax (PerfectScript)
Poke (DDEChannel: Numeric; Destination: String; DataToSend: String)
Parameters
DDEChannel
Channel ID number of the application to send information to.
Destination
Location in the application that receives the information being sent.
DataToSend
Cells containing the information to send to the application.
{POKE} sends information to an application that supports Dynamic Data Exchange (DDE). This application is identified by DDEChannel. The type of application determines what Destination is; the destination could be cells in Excel or a bookmark in Word for Windows. DataToSend refers to cells containing the information to send. You must use the command {INITIATE} to open a channel of conversation before you can use {POKE} (this also determines the value of DDEChannel).
Example
This example starts a conversation with TASKLIST.OVD, which is a file open in ObjectVision. It sets the ObjectVision field Task to the label stored in new_task, and unchecks the Completed check box. Then the new task is inserted into the task list. The command block contains an ObjectVision command not available in Corel Quattro Pro:
dde_channel 10
command [@INSERT(“tasks”)]
exec_result 0
new_task Call Jim re: task priorities
task_status No
_new_vision {INITIATE “VISION”,"TASKLIST.OVD",dde_channel}
{POKE dde_channel,"Task",new_task}
{POKE dde_channel,"Completed",task_status}
{EXECUTE dde_channel,+command,exec_result}
{Preview}
{Preview} is equivalent to File | Print Preview, which lets you preview a printout onscreen.
{Print.Option}
{Print.Option} is equivalent to the menu commands in the following list. To display specific command equivalents, choose one of the following.
Command equivalents for...
File | Page Setup
File | Page Setup | Named Settings
File | Print
File | Page Setup | Options
The command equivalent {Print.PrintReset} resets print settings in all the dialog boxes displayed by these commands.
You can use {Print?} or {Print!} to display the Spreadsheet Print dialog box. {Print?} lets the user manipulate the dialog box, whereas {Print!} relies on the macro to manipulate it.
File | Page Setup | Named SettingsCommand Equivalents
|
File | Page Setup | Named Settings command equivalent |
Equivalent to File | Page Setup | Named Settings... |
|
{Print.Create NamedSetting} |
...| Add, ...| Update |
|
{Print.Delete NamedSetting} |
...| Delete |
|
{Print.Use NamedSetting} |
...| Use |
These command equivalents are equivalent to File | Page Setup | Named Settings. NamedSetting is the named print setting to affect. To update an existing named setting, use {Print.Create}. {Print.Delete} removes a named setting from the active notebook. {Print.Use} sets the current print settings to those stored under the name.
File | Page Setup Command Equivalents
|
File | Page Setup command equivalent |
Equivalent to File | Page Setup... |
|
{Print.Bottom_Margin Value} |
...| Print Margins | Bottom |
|
{Print.CreateFooter Yes|No} Print_CreateFooter(CreateFooter: Yes!|No!) |
Determines whether your print selection contains a footer. |
|
{Print.CreateHeader Yes|No} Print_CreateHeader(CreateHeader: Yes!|No!) |
Determines whether your print block contains a header. |
|
{Print.Footer FooterString} |
...| Header/Footer | Footer |
|
{Print.Footer_Margin Value} |
...| Print Margins | Footer |
|
{Print.Footers_Font “Typeface, PointSize, Bold(Yes|No), Italic(Yes|No), Underline(Yes|No), Strikeout(Yes|No)”} |
...| Header/Footer | Footer Font |
|
{Print.GroupCopies 0|1} Print_Group_Copies(Group: Yes!|No!) |
Will “collate” copies when set to zero, and “group” copies when set to 1. |
|
{Print.Header HeaderString} |
...| Header/Footer | Header |
|
{Print.Header_Margin Value} |
...| Print Margins | Header |
|
{Print.Headers_Font “Typeface, PointSize, Bold (Yes|No), Italic (Yes|No), Underline (Yes|No), Strikeout (Yes|No)”} |
...| Header/Footer | Header Font |
|
{Print.Left_Margin Value} |
...| Print Margins | Left |
|
{Print.PagesDown N} Print_Pages_Down(PagesDown: N) |
Determines how many pages long a print selection will occupy. |
|
{Print.PagesAcross N} Print_Pages_Across(PagesAcross: N) |
Determines how many pages wide a print selection will occupy. |
|
{Print.Orientation Landscape|Portrait} |
..| Paper Type | Portrait or Landscape. |
|
{Print.Page_Breaks Yes|No} |
...| Print Margins | Break Pages |
|
{Print.PageSetupReset} |
...| Load Defaults |
|
{Print.Paper_Type PaperSize} |
...| Paper Type |
|
{Print.Print_To_Fit Yes|No} |
...| Print Scaling | Print to Fit |
|
{Print.Right_Margin Value} |
...| Print Margins | Right |
|
{Print.Scaling 1-1000} |
...| Print Scaling | Scaling |
|
{Print.Top_Margin Value} |
...| Print Margins | Top |
These command equivalents are equivalent to File | Page Setup. When specifying a margin, the default measurement system is used (set in the Windows Control Panel). To use a specific measurement system, place in (for inches) or cm (for centimeters) after the new margin setting (see the example). The new setting is converted into the default measurement system.
Example
This macro sets the top and bottom margins to three centimeters, specifies landscape orientation, and sets the paper size to Legal.
{Print.Top_Margin “3 cm”}
{Print.Bottom_Margin “3 cm”}
{Print.Orientation Landscape}
{Print.Paper_Type “Legal 8 1/2 x 14 inch”}
File | Print Command Equivalents
|
File | Print command equivalent |
Equivalent to File | Print... |
|
{Print.All_Pages Yes|No} |
...| Notebook |
|
{Print.Area Notebook | Selection | Current Sheet} |
...| specify Notebook, Sheet, or a Selection |
|
{Print.Block Block} |
...| Selection |
|
{Print.Copies Value} |
...| Copies |
|
{Print.DoPrint} |
|
|
{Print.DoPrintGraph} |
...| Print (selected chart) |
|
{Print.End_Page_Number Value} |
...| To Range |
|
{Print.Start_Page_Number Value} |
...| From Range |
|
{Print.PrinterSetup Printer; Port; PrintToFile (0|1); Filename; CancelOverwrite (0) | Replace (1) | Backup (2) | Append (3)} |
...| Details |
|
Print_PrinterSetup(Printer?: Printer; Port?: Port; PrintToFile?: 0|1; Filename?: Name; Method 0|1|2|3) |
These command equivalents are equivalent to File | Print (for the commands available for print options, see File | Page Setup | Options). {Print.DoPrint} prints the active notebook (or active chart) using current print settings. {Print.DoPrintGraph} provides a quick way to print a chart. If a floating chart is selected, {Print.DoPrintGraph} prints the chart being shown; if a chart icon is selected, {Print.DoPrintGraph} prints the chart represented by that icon; if a chart window is active, {Print.DoPrintGraph} prints the chart shown.
Examples
This macro selects an icon on the Objects sheet named Report3 and prints the chart it represents.
{OBJECTSPAGEGOTO}
{SELECTOBJECT Report3}
{Print.DoPrintGraph}
This macro prints pages 7 through 12 of a document. The print selection is A3..C234.
{Print.Block A3..C234}
{Print.All_Pages No}
{Print.Start_Page_Number 7}
{Print.End_Page_Number 12}
{Print.DoPrint}
File | Page Setup | Options Command Equivalents
|
File | Print | Options command equivalent |
Equivalent to File | Page Setup | Options... |
|
{Print.Between_Block_Formatting “Lines”|"Page Advance"} |
...| Print Between Selections |
|
{Print.Between_Page_Formatting “Lines”|"Page Advance"} |
...| Print Between 3D Sheets |
|
{Print.Cell_Formulas Yes|No} |
...| Cell Formulas |
|
{Print.Center_Block Yes|No} |
...| Center Cells |
|
{Print.Left_Heading Block} |
...| Left Heading |
|
{Print.Lines_Between_Blocks Value} |
...| Print Between Selections | Lines |
|
{Print.Lines_Between_Pages Value} |
...| Print Between 3D Pages | Lines |
|
{Print.Print_Borders Yes|No} |
...| Row/Column Borders |
|
{Print.Print_Gridlines Yes|No} |
...| Gridlines |
|
{Print.PrintOptionsReset} |
...| Load Defaults |
|
{Print.Top_Heading Block} |
...| Top Heading |
|
{Print.PrintReset} |
Resets all print settings |
These command equivalents are equivalent to the options available in the Spreadsheet Print Options dialog box (click File | Page Setup | Options). {Print.Between_Page_Formatting} and {Print.Lines_Between_Pages} control the amount of space left between notebook sheets (if the print selection spans multiple sheets).
{Print.Between_Block_Formatting} and {Print.Lines_Between_Blocks} control space between the selections that make up a noncontiguous print selection.
Example
This macro specifies that three lines should be printed between each notebook sheet (if the print selection spans multiple sheets), and that row and column borders should print.
{Print.Between_Page_Formatting “Lines”}
{Print.Lines_Between_Pages 3}
{Print.Print_Borders Yes}
{Print.Options_Dialog}
Syntax (Quattro Pro)
{Print.Options_Dialog}
Syntax (PerfectScript)
Print_Options_Dialog()
Displays the Page Setup dialog.
{PUTBLOCK2}
Syntax (Quattro Pro)
{PUTBLOCK2 Data,<Block>}
Syntax (PerfectScript)
PutBlock2 (Data: Any; [Block: String])
Parameters
Data
Entry to type.
Block
Cells to type Data in (optional).
{PUTBLOCK2} enters the same value, label, or formula in multiple cells like {PUTBLOCK} but parses date formats automatically and requires a formula prefix before numeric values. Data is a string or value to place in Block. If Block is not specified, the currently selected cells are used. Block can be noncontiguous; if so, be sure to enclose it in parentheses. If Data is a formula containing relative addresses, those addresses are adjusted automatically.
Examples
{PUTBLOCK2 “Quarter 1",A..D:A1} enters the label Quarter 1 in cells A:A1 through D:A1.
{PUTBLOCK2 +1990,A..D:B1} enters the value 1990 in cells A:B1 through D:B1.
{PUTBLOCK2 “+A1",C3..C12) enters the formula +A1 in C3, +A2 in C4, and so on.
{PUTBLOCK2 “11/01/94", (A:D3,B:D3,C:D3,D:D3)} enters the date 11/01/94 in cell D3 of sheets A through D.
{PUTCELL2}
Syntax (Quattro Pro)
{PUTCELL2 Data}
Syntax (PerfectScript)
PutCell2 (Data: Any)
Parameters
Data
String to type into the active cell.
{PUTCELL2} stores information in the active cell like {PUTCELL} but parses date formats automatically and requires a formula prefix before numeric values.
Examples
{PUTCELL2 “Peggy Danderhoff”} stores Peggy Danderhoff as a label in the active cell.
{PUTCELL2 +45067} stores the number 45067 as a value in the active cell.
{PUTCELL2 “@SUM(A1..A27)”} stores the formula @SUM(A1..A27) in the active cell.
{PUTCELL2 “11/01/94"} stores the date 11/01/94 in the active cell
{PTTESTM}
Syntax (Quattro Pro)
{PTTESTM InBlock1, InBlock2, OutBlock, <Labels>, <Alpha>, <Difference>}
Syntax (PerfectScript)
PTTESTM (InBlock1: String; InBlock2: String; OutBlock: String; [Labels?: Enumeration {Yes!; No!}]; [Alpha: Numeric]; [Difference: Numeric])
Parameters
InBlock1
The first input cells containing a column or row of numeric values.
InBlock2
The second input cells containing a column or row of numeric values.
OutBlock
Upper left cell of the output cells.
Labels
1 if labels are located in the first column or row of the input cells; 0 if the input cells do not contain labels; the default is 0.
Alpha
Significance level of the test; the default is 0.05.
Difference
Hypothetical mean difference; the default is 0.
{PTTESTM} performs a paired two-sample Student’s t-Test for means. Each value from InBlock1 is paired with a value from InBlock2. InBlock1 and InBlock2 must have the same number of values.
{PTTESTM} is equivalent to the t-Test analysis tool.
{PTTESTV}
Syntax (Quattro Pro)
{PTTESTV InBlock1,InBlock2,OutBlock,<Labels>,<Alpha>}
Syntax (PerfectScript)
PTTESTV (InBlock1: String; InBlock2: String; OutBlock: String; [Labels?: Enumeration {Yes!; No!}]; [Alpha: Numeric])
Parameters
InBlock1
The first input cells containing a column or row of numeric values.
InBlock2
The second input cells containing a column or row of numeric values.
OutBlock
Upper left cell of the output cells.
Labels
1 if labels are located in the first column or row of the input cells; 0 if the input cells do not contain labels; the default is 0.
Alpha
Significance level of the test; the default is 0.05.
{PTTESTV} performs a Student’s t-Test using two indepependent (rather than paired) samples with unequal variances. {PTTESTV} is equivalent to the t-Test analysis tool.
{PUT}
Syntax (Quattro Pro)
{PUT Location,Column#,Row#,Value<:Type>}
Syntax (PerfectScript)
Put (Block: String; Column: Numeric; Row: Numeric; Value: Any)
Parameters
Location
Cells within which Value will be stored, either as a value or label, as specified by Type.
Column#
Number of columns into the specified cells to store Value.
Row#
Number of rows into the specified cells to store Value.
Value
String or numeric value.
Type
String or value; string (or s) stores the value or formula as a label, and value (or v) stores the actual value or value resulting from a formula (optional).
{PUT}, like {LET}, copies a value to a particular cell. However, instead of placing the value directly in the specified cell, {PUT} copies Value into the cell that is offset Column# columns and Row# rows into Location.
{PUT} processes Value the same way {LET} does, including the use of :string (or :s) and :value (or :v). If neither of these two optional arguments is supplied, {PUT} tries to store the value as a numeric value; if unsuccessful, it stores the value as a label.
The values for Column# and Row# can be any number between 0 and one less than the number of columns or rows within Location, respectively. A value of 0 implies the first column or row, 1 implies the second, and so on. If Column# or Row# exceeds the number of columns or rows in the cells, the macro stops. ({ONERROR} cannot trap this error.)
Examples
Each of the following examples assumes cell A41 contains the value 25, the selection named numbers has been defined as A44..B50, and data is a cell containing the value 295.
{PUT numbers,1,4,A41:value} copies the value 25 into the cell at the intersection of the second column and the fifth row of the cell numbers (cell B48).
{PUT numbers,1,5,A41:s} copies the string “A41" into the cell at the 2nd column and the 6th row of the cell numbers (cell B49).
{PUT numbers,1,6,data} copies the contents of the cell data to the 2nd column and 7th row of numbers (cell B50). If there is no selection named data, this example instead places a label (“data”) into cell B50.
{PUTBLOCK}
Syntax (Quattro Pro)
{PUTBLOCK Data,<Block>,<Date?(0|1)>}
Syntax (PerfectScript)
PutBlock (Data: Any; [Block: String]; [Date?: Enumeration {Yes!; No!}])
Parameters
Data
Entry to type.
Block
Cells to type Data in (optional).
Date?
Whether to enter Data as a date (1) or a label (0).
{PUTBLOCK} lets you quickly enter the same value, label, or formula in multiple cells. Data is a string or value to place in Block. If Block is not specified, the currently selected cells are used. Block can be noncontiguous; if so, be sure to enclose it in parentheses. If Data is a formula containing relative addresses, those addresses are adjusted automatically.
Examples
{PUTBLOCK “Quarter 1",A..D:A1} enters the label Quarter 1 in cells A:A1 through D:A1.
{PUTBLOCK 1990,A..D:B1} enters the value 1990 in cells A:B1 through D:B1.
{PUTBLOCK “+A1",C3..C12) enters the formula +A1 in C3, +A2 in C4, and so on.
{PUTBLOCK “11/01/94", (A:D3,B:D3,C:D3,D:D3),1} enters the date 11/01/94 in cell D3 of sheets A through D.
{PUTCELL}
Syntax (Quattro Pro)
{PUTCELL Data,<Date?(0|1)>}
Syntax (PerfectScript)
PutCell (Data: Any; [Date?: Enumeration {Yes!; No!}])
Parameters
Data
String to type into the active cell.
Date?
Whether to enter Data as a date (1) or a label (0).
{PUTCELL} is an easy way to store information in the active cell.
Examples
{PUTCELL “Peggy Danderhoff”} stores Peggy Danderhoff as a label in the active cell.
{PUTCELL 45067} stores the number 45067 as a value in the active cell.
{PUTCELL “@SUM(A1..A27)”} stores the formula @SUM(A1..A27) in the active cell.
{PUTCELL “11/01/94",1} stores the date 11/01/94 in the active cell
{QGOTO}
{QGOTO} displays and selects the specified cells. This command is equivalent to the Go To key, F5. You can also use the command equivalent {EditGoto Block}. A related command, {GOTO} moves to the upper-left cell of a destination cells, but does not select the cells.
{QUERY}
{QUERY} is equivalent to the Query key, F7, which repeats the Tools | Data Tools | Notebook Query operation performed.
{Query.Option}
|
Command equivalent |
Equivalent to Tools | Data Tools | Notebook Query... |
|
{Query.Assign_Names} |
...| Field Names |
|
{Query.Criteria_Table Block} |
...| Criteria Table |
|
{Query.Database_Block Block} |
...| Database Cells |
|
{Query.Delete} |
...| Delete |
|
{Query.Extract} |
...| Extract |
|
{Query.Locate} |
...| Locate |
|
{Query.Output_Block Block} |
...| Output Cells |
|
{Query.Reset} |
... | Reset |
|
{Query.Unique} |
...| Extract Unique |
{Query.Option} is equivalent to Tools | Data Tools | Notebook Query, which lets you set up a Corel Quattro Pro database and search for records in that database. {Query.Locate} enters FIND mode and stays under macro control until {PAUSEMACRO} is used or {Query.EndLocate}, which exits FIND mode.
You can use {Query?} or {Query!} to display the Notebook Data Query dialog box. {Query?} lets the user manipulate the dialog box, whereas {Query!} relies on the macro to manipulate it.
Examples
The following macro sets up database cells and criteria table (A2..G37 and H1..H2), searches for records using the criteria table, sets up an output cells at J2..P2, and copies any records found there.
{Query.Database_Block A2..G37}
{Query.Criteria_Table H1..H2}
{Query.Locate}
{Query.EndLocate}
{Query.Output_Block J2..P2}
{Query.Extract}
{QuickCorrect}
Syntax (Quattro Pro)
{QuickCorrect Yes|No}
Syntax (PerfectScript)
QuickCorrect (Enable?: Enumeration {Yes!; No!})
{QuickCorrect} is the command equivalent for Tools | QuickCorrect. It replaces common spelling errors and mistyped words; it can also be used to automatically expand abbreviations. {QuickCorrect Yes} activates the QuickCorrect feature; {QuickCorrect No} turns it off.
{QuickFilter.Go}
Syntax (Quattro Pro)
{QuickFilter.Go CellReference; <OpCode1; Arg1; Conditional1; OpCode2; Arg2; Conditional2; OpCode3; Arg3>}
Syntax (PerfectScript)
QuickFilter_Go(Block?: CellReference Code1?: OpCode1; Arg1?: Arg1; Conditional1?: Conditional1; Code1?: OpCode2; Arg2?: Arg2; Conditional2?: Conditional2; Code3?: OpCode3; Arg3?:Arg3)
Parameters
OpCode#
“equal to”, or “not equal to”, “greater than”, “less than”, “greater than or equal to”, “less than or equal to”, “begins with”, “does not begin with”, “ends with”, “does not end with”, “contains”, “does not contain”.
Arg#
Can be numeric, or a string. Wild cards are not valid.
Conditional#
AND or OR.
Performs QuickFilter operations on a block. Equivalent to Tools | QuickFilter, and then manipulating the QuickFilter buttons on a column header. If there are no optional args, it is the same as “Show All”. You can have 2, 5, or 7 optional args.
Examples
{QuickFilter.Go A:A1}
Flushes ALL filters associated with Column A. Equivalent to “Show All”.
{QuickFilter.Go A:B5;equal to""}
Filters all rows out except for those with blanks in Column B. Equivalent to “Blanks”.
{QuickFilter.Go A:F24;not equal to""}
Filters all rows out except for those without blanks in Column F. Equivalent to “Non Blanks”.
{QuickFilter.Toggle}
Syntax (Quattro Pro)
QuickFilter_Toggle< Block>
Syntax (PerfectScript)
QuickFilter_Toggle< Block?: Block>
Turns on/off QuickFilters for the current cells. Equivalent to Tools | QuickFilter.
{QuickFilter.TopGo}
Syntax (Quattro Pro)
{QuickFilter.TopGo CellReference; <OpCode; Arg>}
Syntax (PerfectScript)
QuickFilter_TopGo(Block?: CellReference Code?: OpCode; Arg?:Arg)
Parameters
OpCode
“top value”, “top percent”, “bottom value”, “bottom percent”
Arg
Must be numeric. Wild cards are not valid.
Performs QuickFilter operations on a block. Equivalent to Tools | QuickFilter, and then manipulating the QuickFilter buttons on a column header. If there are no optional args, it is the same as “Show All”.
Example
{QuickFilter.TopGo A:C51;top value;10}
Equivalent to Top Ten Values. Filters out all rows except those that contain the top 10 values in column C.
{QuickFilter.TopGo A:E17;bottom percent;23}
Equivalent to Bottom 23 Percent. Filters out all rows except those that contain the bottom 23% in column E.
{QUIT}
{QUIT} ends all macro execution, and returns control of Corel Quattro Pro to the user.
Use {QUIT} in conjunction with {IF}, {LOOK}, {MENUBRANCH}, or {MENUCALL} to end a macro under user control.
Example
The following macro displays a menu that has a “Quit” option, which returns the user to Ready mode.
quit_menu Continue Quit
Keep going Quit to Ready mode
{BRANCH \G} {QUIT}
\G {MENUBRANCH quit_menu}